
7 Easy Steps of Sump Pump Installation: A Comprehensive Guide
If you’ve got a can-do attitude and the necessary know-how, you can follow these 7 steps to install your new sump pump system.
But remember, sump pump installation is not easy. We strongly encourage you not to DIY. Not only does it involve excavation, but it can end in disaster if not done carefully. Further down, we explain why.
Instead, call a professional to do it for you. At Foundation Recovery Systems, we install sump pumps the right way and prioritize your safety. It will also save you time: for you, this process could take an entire week, but we do most installations in just a day.
For a free inspection and guidance on sump pump installation, call us today!
What is a Sump Pump?

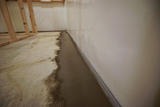
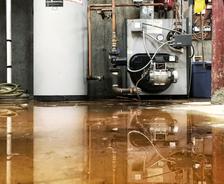
A sump pump is a basement waterproofing system that protects your basement from flooding.
It takes in water from the soil beneath your home and from your basement’s interior drainage system. It then moves that water out of your home and away from your foundation where it can’t do it any harm.
It doesn’t matter how water gets into your basement—whether from rain, burst pipes, or leaks through basement wall cracks. If it’s in there, it’s a big problem. A sump pump is the solution.
When to Install a Sump Pump
If you don’t have a sump pump in your basement, it’s time get one. Don’t wait till your basement shows signs of water damage. instead, have it installed as soon as possible.
There’s no specific “best time of the year” to get one installed, but you’ll thank yourself by doing it before the next time it rains.
We also recommend combining a sump pump with other comprehensive basement waterproofing solutions.
Types of Sump Pumps: Pros & Cons
If you’re wondering about the types of sump pumps out on the market, there are a lot, and it’s difficult to know which one will be best for your basement.
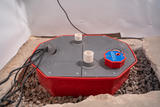
1. Submersible Sump Pump

Submersible pumps are our top recommendation for a sump pump type. They are designed to sit within the sump basin (AKA the “sump pit”) and as level with the basement floor as possible. This design means the pump is out of the way, quieter, and situated in such a way that the pump doesn’t have to fight gravity as much when in operation.
If you want a quiet pump with excellent flood protection, a submersible pump is your best option.
Pros:
- Operates underwater, ideal for high water levels
- Automatically activates when water reaches a certain level
- Uses direct pressure to move water over great distances
- Starts working immediately upon installation
- Protects motors from burning out
- Capable of moving large volumes of water
- Take up less space in your basement
Cons:
- More excavation work effort necessary to install
- Higher risk of installing incorrectly
2. Pedestal Sump Pump
A pedestal sump pump is positioned above the sump basin, unlike the submersible type which is placed in the basin itself. Still, it operates in a similar way: the pump is activated when water levels rise, removing large volumes of water.
Pros:
- Efficient in moving large volumes of water
- Economical
- Suitable for areas prone to heavy rainfall, snowfall, or flooding
Cons:
- Likely to malfunction if not regularly checked
- Susceptible to damage due to its open nature
- Can lead to elevated humidity levels or basement flooding
- loader than submersible sump pumps
In conclusion, while a pedestal sump pump has its advantages, it requires regular maintenance and checks to ensure optimal functionality and longevity.
3. Water-powered Sump Pumps
A water-powered sump pump operates without electricity, utilizing your home’s water supply for power. It’s environmentally friendly, ejecting two gallons of water from the sump pit for every gallon of water used, and can function continuously as long as the water supply is constant.
Pros:
- Doesn’t require electric power, a significant advantage during storms.
- Uses water pressure as the power source, resulting in no wasted energy.
- Can operate continuously for long periods, even during power outages.
- Water used in the process is returned to the earth via a storm sewer.
Cons:
- Requires a water pressure between 40-90 psi to operate smoothly.
- Connection pipes should be made from copper for rust resistance, which may not be a standard in all homes.
In conclusion, a water-powered sump pump is a reliable and environmentally-conscious choice for homes with a consistent water supply and the required water pressure.
4. Combo and Back-Up Sump Pumps

A back-up sump pump (AKA a “combination pump”) is a type of centrifugal pump that provides an extra layer of protection. It can come either as a submersible or a pedestal pump, but it’s main difference is that it features 2 or more pumps all working together. At Foundation Recovery Systems, our AquaStop™ Basement Triple has 3 pumps for unparalleled protection: a primary SafeDri™ 1/3 hp pump, a secondary SafeDri™ 1/2 hp pump which activates if the primary pump is overwhelmed or fails, and a third battery back-up pump.
Pros:
- Provides extra layer of protection with a backup pump
- Battery ensures operation even during power outages
- Alarm system alerts when the primary pump fails
- Efficient water ejection system
Cons:
- The system may be complex to install and maintain
In conclusion, the combination sump pump provides a reliable and efficient solution for basement water problems, ensuring continuous operation even in the event of primary pump failure or power outage.
5. Battery-powered Sump Pumps
A battery-powered sump pump is a type of basement water drainage system that operates even during power outages. It is activated by a float switch when water enters the basin, making it an effective solution for areas prone to storms and frequent power outages.
Pros:
- Continues to operate during power outages
- Suitable for areas with frequent storms and power outages
- Increases safety and protects against basement water damage
- Available in various sizes to accommodate different sump pit sizes
Cons:
- Requires regular battery checks and replacements
- Usually not as powerful plug-in models, so a higher risk of overflowing
In conclusion, a battery-powered sump pump is a simple solution for basement water drainage, but it has some key limitations around its power, pressure, and maintenance. It requires a more watchful eye to work well.
The Basic Parts of a Sump Pump
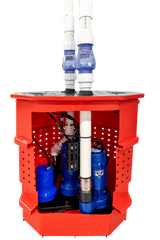
A good sump pump will have all or most of the following parts:
- An alarm notifies you if your pump fails to turn on in the midst of a storm or flood.
- A secondary pump kicks into gear if the primary one fails or becomes overloaded.
- A battery back-up keeps the pump running if your power goes out.
- A check valve keeps water from flowing back into your basement after cycling through your pump.
- A sump liner keeps the inner workings of your sump pump’s electrical components dry.
- An airtight lid seals in unpleasant smells and additional humidity.
- A sump stand lifts your pump above an debris that could damage pump.
- An insulated discharge line stops the water from freezing in cold weather.
How to Install a Sump Pump
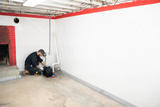
1. Excavate the Sump Pit in the Lowest Area of Your Basement
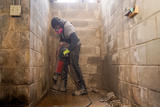
First, you need to excavate a place in your basement floor where your sump pump will go (ie. the “sump pit”). It should be in the lowest area of your basement (usually in the cove joint) where it can collect the most water. If you put it anywhere else, it won’t work.
Need help placing it? call a basement waterproofing specialist to help you. If the sump can’t fit in the lowest spot, run a PVC feed line from there, down through the floor, to your pump.
Once the best place is determined, it’s time to break out the jack-hammer.
Pro Tip: Sump Pit Size
The size of the sump pit will vary based on the brand and size of the sump pump you want to invest in. Take care to make its width and depth the proper size.
If the pit is too small around, your pump will try to push water out faster than it can fill the sump pit. This will make it turn on and off rapidly and burn out. Too big, and it will get overloaded in heavy rain.
If your pit is too shallow, it won’t remove the water from the ground beneath your basement; make it too deep, and it will overwork itself, raising your energy bills on regular days, and totally swamping it on rainy ones.
2. Place the Liner in the Excavation Site
Put down the sump liner in the sump pit before dropping your pump into place.
Sump liners vary in design. Read the instructions for yours carefully before you install it.
3. Install a Perimeter Drain System
We highly recommend installing an interior drainage system like our own BasementGutter™ to take in water from the surrounding soil. This reduces the likelihood of damage from hydrostatic pressure.
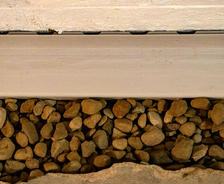
Be warned: this will require more excavation. Again, you’ll have to use a jack-hammer to cut away the floor around the perimeter of the basement. Fill the bottom perimeter with clean stone to let water pass through but catch larger debris. In the case of BasementGutter™, a custom-engineered perimeter drain is installed on top of the stone and then backfill it in more.
Pro Tip: “Weep Holes”
If your home has concrete block walls, you’ll also have to drill “weep holes” in the blocks at the very bottom to relieve the water pressure that is pressing in on your basement. This is really important because, if you don’t, the pressure could collapse your wall entirely resulting in a condemned home and possible injury (or worse).
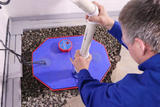
4. Install the Sump Pump
Plug in your pump to a dedicated outlet and connect the perimeter drain to the sump pump. Backfill the sump pit with more clean stone clean gravel outside of the liner.
Pop on the airtight lid (as an added bonus, this will discourage animals and children from attempting to play in the water) and place rubber grommets around all pipes and wires.
Pro Tip: Secondary Discharge Line
If your sump pump has a secondary pump, install an additional discharge line for it. This will ensure the pumps don’t push water back and forth against each other.
5. Restore Floor
To complete the main effort of sump pump installation, restore the floor with concrete.
Remember: don’t cover over the sump pump. You need to be able to access it for any future maintenance or replacement.
6. Install (and Bury) the Discharge Line

Next, you need to install an exterior discharge line to eject the water out of and away from your home.
It’s important to bury your discharge line so that it doesn’t freeze (we offer additional protection from frozen discharge lines with FreezeGuard™).
Reduce disruption to your landscaping by carefully removing sections of the lawn in whole pieces before making the trench for the pipe. Install the outlet flush with the ground so that you don’t damage it with your lawn mower.
One final note on this, if you find that water is drainage in through your discharge line, it’s okay. Your sump pump can handle a water coming in from any part of your drainage, and so that water will get pushed back out eventually.
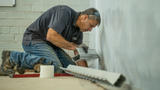
7. Finishing Touches & Clean-Up
With your pipes installed and your pump in place, apply sealants to any gaps or holes that might allow water to spill out of your system.
After that, it’s clean-up time. Get all the debris and trash out of your basement and into the trash.
Our sump pump installation crews take extra care with this last part. We leave your basement clean, neat, and clear of debris for you at the end of the installation. Most times, customers comment their basement is cleaner after sump pump installation than it was before. We even like to dust up a little.
Once the work is done, rest easy. You’ve got a safe, dry basement, and that feels good.
Tips on Maintaining and Replacing Your Sump Pump
Here’s our top tips on maintaining your sump pump and knowing when it’s time to replace your old one.
Steps for Regular Sump Pump Maintenance
Follow these steps and checks regularly, at least every other month, but especially before, during, and after a spat of heavy rain.
- Check the power source to ensure it is connected and live.
- Inspect the sump pit for debris.
- To test your sump pump, pour a bucket of water into the sump pit and observe.
- Listen for any unusual noises.
- Check the outlet pipes for any debris or obstructions.
- Confirm the pump is positioned correctly in the housing. If it tips over, it could jam the float switch.
- Clean the pump as per the manufacturer’s instructions.
- If your pump has a battery back-up, unplug it from the wall, and see if the pump still works.
- Inspect the check valve to ensure it prevents water from re-entering the sump pit.
Signs It’s Time to Replace Your Old Pump
If you can check off one or more of the following problem signs, it might be time to replace your sump pump:
- Is more than 7 years old.
- Frequently gets stuck or jams.
- Runs continuously, even in dry conditions.
- Makes strange sounds.
- Fails to turn on when water enters the pit.
- Ejection pressure is significantly lower than normal with no other signs of malfunction.
- Is simply falling apart.
- Has rust or other forms of corrosion around vital parts of the pump.
Installing a Sump Pump Yourself Vs. Hiring a Professional
If you’re thinking about doing sump pump installation on your own, consider these pros and cons first
DIY Installation
Pros:
- Potential for cost savings if the project is executed flawlessly
- Satisfaction of completing a home improvement project
Cons:
- High risk of incorrect installation, leading to potential structural damage
- High time and effort requirements
- Possibility of injury during installation
- Potential for higher costs due to errors or unexpected complications
- Lack of warranty or guarantee on the work
Professional Installation
Pros:
- High assurance of correct installation
- Safety during installation
- Time savings and convenience
- Cost is known upfront, preventing unexpected expenses
- Work is typically guaranteed or under warranty
- Professionals have specialized knowledge and equipment
Cons:
- Higher upfront cost
Why You Shouldn’t DIY Sump Pump Installation
Now that we’ve taken you through all the steps of sump pump installation, it might sound a little weird to hear us say this (again), but here it is: don’t DIY your sump pump!
In order to complete a sump pump installation, you need these 3 things:
- Pro-level understanding of how your basement supports your entire house.
- Pro-level expertise on handling the soil around your basement.
- Pro-level equipment to stop the soil from compromising the structure of your basement (and therefore your entire home).
If you go into the process with anything less than all three, you could get it wrong, and that spells disaster.
What kind of disaster, you ask? Well, this kind of disaster:
1. You Can Easily Waste A Lot of Money
From getting the right pump and accessories to renting the right equipment, you might spend a lot of money only to find an unforeseen roadblock and have to put the whole thing off.
Plus, it’s a sensitive process: if you get one small detail wrong, it could put the whole project (and your home) at risk.
2. It Could Destroy Your House

Excavation work on your basement will temporarily weaken it against the surrounding soil. If you don’t support it in the process (or see to it that support is added after the process), your basement wall could collapse.
When that happens, there’s a terrifying chance that a large portion of your home, or even your entire home, could collapse along with it.
That’s why we say call the pros.
3. It’s Really Dangerous

That said, if you get something really important wrong, get out of your house immediately. If you sense that there is anything at all that doesn’t look, smell, or sound right, get all occupants out of your house immediately and call a professional.
Even professionals have been seriously injured (and worse) in the process of basement waterproofing.
Please call a professional before you try doing this yourself.
FAQs
Yes, we recommend a separate circuit to prevent overload and ensure uninterrupted operation.
Typically, yes. The sump pump is crucial for expelling the collected water from the interior basement drain to the exterior of the home. There are several other options, however; your certified inspector will review all your options during the free inspection.
Sometimes. Continuous operation can indicate problems such as a stuck switch, a malfunctioning float, or an incorrectly sized pump and should be addressed promptly to avoid burnout. However, during heavy rainfall or snowmelt season, your pump may need to run nearly continuously to keep up with the amount of water threatening to enter your basement.
Regular checks and maintenance will help determine the reason for a continuous run.
Call Foundation Recovery Systems for Sump Pump Installation Today

Foundation Recovery Systems offer professional basement waterproofing in Missouri and Northern Illinois. We are ready to help you start and complete your sump pump installation project safely and quickly.
Call us today for a free basement inspection.
Related Resources

Publish Date:
Last Modified Date:

Our Locations
3349 Southgate Ct SW,
Cedar Rapids, IA 52404
(319) 220-5034
14678 E 925 North Rd, Building 5
Bloomington, IL 61705
2401 SE Creekview Dr.
Ankeny, IA 50021
(515) 373-8491
7280 NW 87th Terrace, Suite C-210
Kansas City, MO 64153
(816) 774-1539
211 SE State Route 150
Lee's Summit, MO 64082
(816) 774-1539
1872 State Hwy M
Moberly, MO 65270
(660) 202-8662
3020 N. Martin Ave.
Springfield, MO 65803
(417) 612-8286
1625 Larkin Williams rd.
Fenton, MO 63026
(314) 207-9995